If you are like many people, you sometimes have difficulty finding the perfect piece to finish off a room. Sometimes, I have a decorative item in mind, but I just can’t seem to find it in local shops, big box stores or online. So, what’s a picky girl to do? Make something!
Thankfully, creating a custom piece of decor for your room doesn’t need to be difficult. You simply need to have an open mind while you shop and a few basic craft skills.

I was shopping a local thrift store when I ran across this wool-blend stadium blanket made by Faribault Woolen Mills – a high-quality manufacturer based in Minnesota. It was brand-new, in the package, and cost just a few dollars. But, it was boring – basic, solid navy. Which is probably why it was still there. I saw that solid navy fabric as a blank canvas, and thought about how I could embellish it to meet my needs.

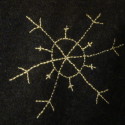
Since it’s winter around these parts (a high of ZERO degrees today – yikes!), I immediately thought that I could embroider the blanket with a few snowflakes. The white yarn on the dark background would make a bold graphic statement, and it would be a one-of-a-kind creation for my living room.

For the snowflakes, I used a backstitch to create the lines. This is a very simple embroidery stitch, and you can see a great tutorial on how to do it here. I used a basic acrylic yarn and a large, blunt yarn needle to do the stitching.
Before I started sewing, however, I selected three different circular objects to trace on my blanket to make a pattern. I wanted to make sure that my snowflakes were at least somewhat circular in shape! I found that lids to plastic containers worked great for this. I used sewing chalk to mark my circles, then divided each circle into 6 parts. I eyeballed this – measurements really aren’t necessary, since the snowflakes don’t need to be perfect!
I made each snowflake unique and each one a different size; I arranged them in the corner of the throw, but they could be placed anywhere. And, I didn’t really use a pattern to come up with the snowflakes’ designs. I just used my imagination and made them up as I went along, sewing the 6 straight lines first, then embellishing them until I thought they looked finished.

To tie things together visually and add another level of interest, I also decided to whipstitch around the edges of the blanket in the same white yarn. In the interest of not reinventing the wheel, I’ll direct you to a great little tutorial I found to describe how to do a simple whipstitch – super easy.

Be sure that you work carefully in the back side of the blanket, too. Run the needle under your stitches so your yarn doesn’t weave all over in a random pattern. Remember, it’s a throw blanket, and people will see the backside – keep it neat! The back of the blanket is shown below…not too bad.

And, that’s it! I’m certainly no embroidery guru, and my stitches are not perfect by any means. But, I was able to create something for my home that no one else will have, and it only took me a few evenings of stitching to achieve it. Give it a try – and take a second look at those not-quite-perfect home decor items you see in the store. You may be able to create something new with it and make it perfect for your home!
Pin It