All of us have old, hand-me-down furniture we dislike. The good news is that a simple coat of paint can transform those oddities from years past into fantastic pieces you will be proud to show off!
What you need:
- Wood furniture, accessories or picture/mirror frame you wish to give a new life
- Fine grit sandpaper, either for hand sanding or for a small power sander, like the Mouse Sander (my favorite DIY power tool!)
- Primer
- Paint of choice, oil-based
- Assorted paint brushes. The size you need depends on the size and intricacy of the piece you are painting
- Mineral spirits and rags
- Old sheets or drop cloths
- Painters tape

This is a "side of the road" find - we got it free and painted it for my daughter's room!
First, put drop cloths under your furniture piece to protect your floor from wayward paint splatters. If your piece includes upholstered areas, or parts you don’t want to paint, be sure to mask those off with tape or plastic, as well.
Using the sandpaper, lightly sand the furniture. Move the paper in the direction of the wood grain, so you don’t put scratches in the surface. The point here is not to create a perfectly smooth surface; rather you need to rough up the surface of the varnished wood so it will accept the paint. If there are any holes or marks that need to be repaired, now is the time to take care of these things, as well. Make sure chair legs are steady and re-glue any loose joints. Let dry thoroughly before continuing with the next step.
Using an old rag dampened with mineral spirits, wipe down all surfaces you plan to paint. This will remove dust and any lingering grease that may have been on the surface; these things can mar your finished surface.
Next, prime the furniture. Usually, primer needs to dry at least an hour before you can continue with your final coats of paint. Watch for drips and splatters, as these will show through the paint, creating an uneven surface.
Now you are finally ready to paint! Use 2 coats of oil-based paint for best results. Move in the direction of the grain, when possible, in smooth, even strokes. Let the paint dry thoroughly, according to manufacturer recommendations, before adding the second coat. If you are using more than one color, let the first color dry before adding the second. Let the paint dry completely, and you are ready to use your transformed furniture.

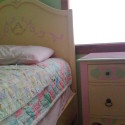
This is the bed after a new coat of paint. I added pink and green scrolls to the headboard for some girly fun.
Tips for Success:
- Oil-based paint needs to be cleaned up with mineral spirits. It has a durable surface, which holds up better than most latex paints when used on furniture. Consider either semi-gloss or glossy finish for best results.
- Use your imagination! Remember, this is your custom piece of furniture. Add 2 or more colors, paint patterns or designs – the sky’s the limit!
- Oil-based paint (alkyd) and mineral spirits are best used out of doors. They are smelly, and not safe to breath for long periods of time. Use proper ventilation when using these products.
- Clean up any paint spills immediately; this paint is permanent and cannot be completely removed once it has stained a surface!

Here is the newly painted bed, with a refinished desk to match. A custom look on a very small budget!
Disclosure: Clicking on the link in this article may result in a commission for A Little Design Help.
[…] explained the process of how to paint a stained piece of furniture in a prior article, so I won’t get into the nitty-gritty details here. But, you may like to […]
[…] fantastic with her bed. The pink and green details on the desk work perfectly with the scrolls I painted on her headboard. For just a few bucks, I was able to create a brand-new piece for her bedroom – a piece […]
[…] a bit, to give the paint something to adhere to. I chose not to use a primer on this piece, as I normally would, because I wanted the original stain color to come through in the distressing. After sanding, I […]
[…] When home decor and furniture are refinished, they are sometimes referred to as “upcycled” items. They are not, in fact, upcycled at all. Instead, they are simply “refinished” items. Upcycling is a completely different concept, and one that takes a bit more imagination and vision than simply refinishing furniture. […]
[…] How to paint stained furniture for a custom look | a […]