As some of you may know, I recently opened a small shop called RE:Treats, featuring new, vintage and repurposed furniture, home decor and gifts. The opportunity came up rather suddenly, but I took a chance and ran with it! So, for the past month, I have been finding, buying and refinishing furniture and home accessories. I’ll be sharing my creations with you here, along with the technique I used to get the look. First up: a basic table refinishing project.
I got this end table from a second-hand store, and I like the turned legs and general shape of the piece. The stain color was pretty boring, and it had some scratches in the top. The table has some nice details – raised panel drawer, turned legs, etc. So, I thought a black painted finish with a bit of distressing would be just the ticket to highlight those details.

I had already removed the drawer hardware before I took the photo. You will also notice that I’m repainting this piece of furniture in my kitchen. An unheated garage + January in Wisconsin = refinishing furniture in the kitchen. I’m thankful for a patient husband. 🙂

My first step in this project was to remove the drawer, remove the hardware and lightly sand the entire piece with fine-grit sandpaper. The purpose was simply to rough up the surface a bit, to give the paint something to adhere to. I chose not to use a primer on this piece, as I normally would, because I wanted the original stain color to come through in the distressing. After sanding, I washed the surface with a damp rag.
Next, I applied a very thin coat of petroleum jelly to the edges of the drawer and other areas I wanted to highlight. The jelly keeps the paint from sticking to the surface in those areas, making the distressing a bit easier. It worked! But, I think it gave me a little less control over my distressing, so I don’t think I’ll use the technique again.

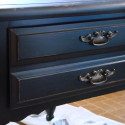
I then painted the entire piece in black semi-gloss latex paint; I used three coats, letting it dry between them. I let it dry overnight, then used fine sandpaper to bring out the highlights with just a little bit of distressing; if you like more, you can certainly add more – I went with just a touch of it on this piece. Enough to highlight the details, but not so much as to make it look old and shabby.

I also washed the surface with a bit of mild/soap and hot water to get rid of any residue of the petroleum jelly. When it was dry, I reattached the hardware and voila! A cute piece for someone’s home…
Pin It