Let’s face it – dry erase boards are usually pretty ugly. The are called “white boards,” after all – blah. But, a little elbow grease and a few bucks can net you a beautiful dry erase board in the exact size and color you need for your home.
I found this horrid piece of artwork at the local thrift shop for just a few dollars. While the print inside the frame is ugly, the frame itself is solid, it’s a good size, and it’s interesting; the woven texture adds a little something extra, and I knew it would be gorgeous with a coat of paint.

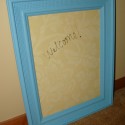
I disassembled the frame, carefully setting aside the back board and the glass. I had to wash the layer of grime of the glass, too, so I didn’t trap a bunch of dust behind it when I put everything back together again! Next, I wiped the frame down to remove dust and get it ready to paint. I painted first with one coat of primer and let it dry for about one hour. Then, I painted 2 coats of my chosen color – a bright and fun turquoise called Slow Dance by Clark + Kensington (available at Ace Hardware stores) – letting it dry between coats. I also painted the back of the frame after the front had dried, since the shape of the frame allows you to see the back when it’s hung on the wall. I used a flat paint finish, but you could use one with more gloss, depending on your preference.
I used an old piece of designer wallpaper behind the glass to add some pattern. Be careful here – you don’t want to select something too busy, or you won’t be able to read anything you write on the glass! Tone-on-tone patterns work well for adding style without being too distracting. You could put almost anything behind the glass – fabric, a collage of smaller scrapbook papers, a washed-out family photo – use your imagination. I simply used the back board from the frame as a template, tracing around it onto the wallpaper. Cut it out, reassemble the frame, and voila! This is the final result:

I just love the way it turned out! This was a very easy project that took just an afternoon to complete – mostly due to paint-drying time. Any dry-erase marker will write on the surface of the glass, and it wipes right off when you want to change your message. Give it a try – your family can be stylish and organized all at the same time!
Pin It