I’ve lived in my house for over 10 years (which is hard to believe, but that’s a whole other story) and I’ve walked by this awkward little space along my stairway probably half a million times. Only recently, probably about the time I realized I had WAY more books than I had the space to store them, I thought it would be a great place for some additional storage. Read on to see the before and after pics, and to find out how to create them in your home.
Many homes have a space like this odd little ledge along the stairs to our basement. In many newer homes, this ledge runs all the way around the exterior walls of the lower level. But, in our house, it was just a funny, empty space that had no purpose. And, our house is too small to have dead, useless spaces. So, we set to work.

This narrow ledge was dead, useless space. No more!
The ledge is under 6″ deep. Since I didn’t want the shelves above the ledge to stick out beyond the ledge (my children run down these stairs at 100 mph some days, I don’t need them injured or my shelves destroyed), I had to find brackets that were small enough. This proved to be a little bit of a challenge, since the most basic shelf brackets are meant for 6″ shelves! Luckily, I found these little black scroll brackets that fit the bill – under 5″ deep.
Also, we had to do some careful measuring to get the shelves cut to the right lengths. Since one side is angled, we needed to know exactly where the shelves would sit before we cut them, which is why we installed the brackets before we had the boards ready to go. I placed the tape measure across the tops of the brackets until it hit the ceiling on one side and measured the length of each shelf that way. Pretty simple.

These brackets were perfect! Strong and not too deep.
I didn’t want to spend a lot of money to get these shelves installed, so my husband and I scoured the garage to see if there was something that we could make the shelves out of. We found an old pine board in the rafters, and it was 5-3/4″ deep – perfect! It had a few old pencil marks and paint on it, but it worked for me. So, my kiddos and I set out to freshen up the shelves after my husband cut them to length (note to self: make sure husband measures twice and cuts once next time. Bottom shelf ended up a little short, but I still love him. And my shelves. But, I digress…)

Nothing fancy, but definitely shelf-worthy!
We stained the boards to bring out the grain a bit, and to approximate the color of the other wood trim in the vicinity of the shelves. The kids enjoyed helping with this process, and I didn’t mind letting them try staining. This was actually the perfect job to get them involved in, since the boards were not perfect to begin with, much of the shelves will be covered by books anyway, and this is not a high-visibility space in my home (the kids spend a lot of time in the family room, but I pretty much head down to visit the laundry room). So, any mistakes the kids made would be hard to notice anyway – the perfect learning project!

Staining!
A couple of tips for your staining project: First, make sure you and your kids are in old clothes, because you will get dirty. Rubber gloves are also a good idea, but I didn’t happen to have any. Work in a well-ventilated space, and allow the stain to dry thoroughly before varnishing the wood. If the boards you are using are a soft wood, like pine, you may need to use a wood conditioner to keep the stain from getting splotchy. I didn’t bother with that here, but on a project where the wood will be front and center, a wood conditioner is a must. After staining all sides of the boards, we varnished all sides (not all at once, or the boards will stick to the sawhorses!) with an oil-based varnish. We stained one side of each board and the edges with two coats of varnish, allowing the finish to dry for several hours between coats. The next day, we did the same to the back sides of each. After drying for about a day (follow the directions on your can of varnish for dry times), they were ready to install!

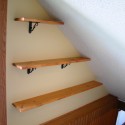
Success!
We installed the brackets into the studs of the wall, to ensure they would hold all the books I need them to hold. And, these shelves are definitely sturdy! When you select brackets for your own shelves, read the package, as it will often tell you how many pounds of weight it will support after installation. Depending on what you plan to store/display on your shelves, you can choose the best option for your application. If the stud locations won’t work for your installation, be sure to use wall anchors to secure your brackets.
Now, you may notice that we installed only 1 bracket to hold the top shelf. While it’s not the sturdiest shelf of the bunch, it is sufficient for a couple of lightweight items. I just really like the effect of having all the brackets lined up perfectly, and installing another bracket at the top would have thrown that out of whack. We do have another bracket if we find it necessary to install later…but, so far, so good!

A place for our "stuff."
As you can see, I’ve already got our new shelves nearly full. While this isn’t the arrangement I plan to stay with, it gives you an idea of how they function in the space. Paperback books fit perfectly on the ledge, and I can get a little larger book on the upper shelves. I was actually amazed at the number of books I was able to put on the shelves; I still have some more to sort through, but many have found their new home. This project was a really simple way to add function to a useless space; give it a try!
Pin It
[…] can be desirable; in fact, some folks choose an oil-based varnish precisely because they love the rich, golden tone on their furniture, trim or flooring. Also, oil-based finishes tend to enhance the look of the wood grain, bringing it out and making […]
great use of “dead” space